Saving documents
By default, you can save documents in WordPerfect 6–X5 format. This ensures cross-platform compatibility for documents saved in WordPerfect 6.x and later, and lets you save a document in an earlier version of WordPerfect. You can also save documents in formats other than WordPerfect, such as Microsoft Word.
You can save selected text or graphics in a new WordPerfect document.
WordPerfect lets you save documents in compound file format. When you save a document in compound file format, OLE compound document information is wrapped around the WordPerfect document, which lets you open the document more quickly. However, saving a document containing embedded objects in compound file format increases both the file size and the time required to open and save the file.
WordPerfect lets you create backup copies of documents. Creating backup copies helps prevent the loss of your work if you close a document before saving it, or if a power failure occurs.
When you save a document, it may contain information that you do not want others to see. For example, the name of your computer or a document summary may be included in the file. This information is known as metadata, which is data used to identify, describe, and locate electronic resources on a network. Metadata is used to enhance the editing, viewing, filing, and retrieving of electronic documents. It is important to keep this information stored in the original document, but you can avoid sharing the metadata with others by saving a version of the document without including the metadata.

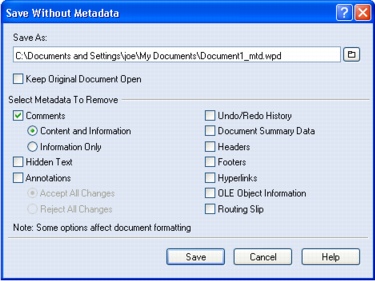
The Save Without Metadata dialog box makes it easy to remove metadata from your documents.
To save a document |
|
1.
|
|
Click File
|
|
2.
|
|
Choose the drive and folder in which you want to save the file.
|
|
To save a file in a format other than WordPerfect, choose a file format from the File type list box.
|
|
3.
|
|
Type a name in the Filename box.
|
|
To embed the fonts in the document, enable the Embed fonts using TrueDoc check box.
|
|
4.
|
|
Click Save.
|
|
You can also
|
|
|---|---|
|
Save changes to a document
|
Click File
|
|
Rename a file
|
Right-click the file, and click Rename. Type a new name in the Filename box.
|
![]()
|
•
|
|
If you have already saved the document, you will not be prompted to specify the drive, folder, and filename.
|
|
•
|
|
A filename cannot exceed 255 characters.
|
![]()
|
•
|
|
You can also save a document by pressing F3 or by clicking the Save
|
To save a document to a new location |
|
1.
|
|
Click File
|
|
2.
|
|
From the Save in list box, choose the drive and folder in which you want to store the document.
|
|
If you want to embed the fonts in the document, enable the Embed fonts using TrueDoc check box.
|
|
3.
|
|
Click Save.
|
![]()
To save selected text or a graphic in a new document |
|
1.
|
|
Select the text or graphic you want to save in a new document.
|
|
2.
|
|
Click File
|
|
3.
|
|
In the Save area, enable one of the following options:
|
|
•
|
Selected text
|
|
•
|
Selected graphic
|
|
4.
|
|
Click OK.
|
|
5.
|
|
In the Save file dialog box, choose the drive and folder in which you want to save the file.
|
|
6.
|
|
Type a name in the Filename box.
|
|
7.
|
|
Click Save.
|
To save a document in compound file format |
|
1.
|
|
Click File
|
|
2.
|
|
Type a name in the Filename box.
|
|
3.
|
|
Choose WordPerfect compound file from the File type list box.
|
|
4.
|
|
Click Save.
|
![]()
To set timed document backups |
|
1.
|
|
Click Tools
|
|
2.
|
|
Click Files.
|
|
3.
|
|
On the Document page, enable the Timed document backup every check box.
|
|
4.
|
|
Type a value in the minutes box.
|
To save a document without metadata |
|
1.
|
|
Click File
|
|
2.
|
|
Choose the drive and folder in which you want to save the document.
|
|
By default, _mtd is added to the filename to identify that the file does not contain metadata.
|
|
3.
|
|
Enable the Keep original document open check box.
|
|
If the Keep original document open check box is not enabled, the original document closes, and the metadata-free version remains open.
|
|
4.
|
|
In the Select metadata to remove area, enable any of the following check boxes:
|
|
•
|
Hidden text
|
|
•
|
Annotations
|
|
•
|
Undo/redo history
|
|
•
|
Document summary data
|
|
•
|
Headers
|
|
•
|
Footers
|
|
•
|
Hyperlinks
|
|
•
|
OLE object information
|
|
•
|
Routing slip
|
|
5.
|
|
Click Save.
|