Creating data for a merge
When you merge documents, you produce varying copies of a form document. Each copy contains specific information from a record in a data source, such as a data file, an address book, or keyboard input.
To use a WordPerfect data file as the data source, you can create either a data text file or a data table file. In both types of data files, information is organized into records and fields. For example, a record may include a name, address, telephone number, and other contact information. Each item within the record, such as name or address, is recognized as a field. It is recommended that you use no more than 512 fields per record.
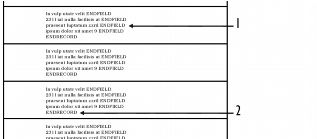
When you create a data text file, each field is marked by the ENDFIELD code and each record by the ENDRECORD code.

This is an example of a data text file containing 1) ENDFIELD codes and 2) ENDRECORD codes.
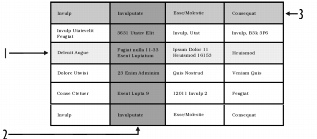
When you create a data table file, fields and records are arranged in columns and rows. Each column contains a field. Each row contains a record.

This is an example of a data table file containing 1) records, 2) fields, and 3) field names.
You can retrieve data from other file formats to use as data files in WordPerfect. For example, you can retrieve and convert a database file, a spreadsheet file, an ODBC data source, or a text file. For information about converting files, see “Opening and previewing files.”
You can also use an address book as a merge data source. For information, see “Using address books in merges.”
When you create a data file, WordPerfect automatically inserts a Merge toolbar into the merge data file. For more information about the Merge toolbar, see “Using the Merge toolbar.”
To create a data file for a merge |
|
1.
|
|
Click Tools
|
|
2.
|
|
In the Merge dialog box, click Data source
|
|
If there is text in the active document, enable one of the following options in the Data file source dialog box:
|
|
•
|
Use file in the active window — uses the active document
|
|
•
|
New document window — creates a new document
|
|
3.
|
|
Click OK.
|
|
4.
|
|
In the Create data file dialog box, type the name of a field in the Name a field box.
|
|
For example, if you are creating data for a form letter, you might include fields such as name, address, city, province, postal code, phone number, and e-mail address.
|
|
To create a data table file, enable the Format records in a table check box.
|
|
5.
|
|
Click Add.
|
|
6.
|
|
To organize a selected field, click any of the following:
|
|
•
|
Replace — replaces the name of the selected field
|
|
•
|
Delete — deletes the selected field
|
|
•
|
Move up — moves the selected field up in the Fields used in merge list
|
|
•
|
Move down — moves the selected field down in the Fields used in merge list
|
|
7.
|
|
When you are satisfied with the field names and arrangement for your data file, click OK.
|
|
8.
|
|
In the Quick data entry dialog box, type information for each field that you have created.
|
|
9.
|
|
Click New record to add the completed record to your data file. Repeat steps 8 and 9 to continue adding records to your data file. Click Close, and click Yes.
|
![]()
|
•
|
|
It is recommended that you use no more than 512 fields per record.
|